Imagine trying to tune a musical instrument with a worn-out string versus using a brand new one; the difference in precision is vital. When it comes to bed leveling in 3D printing, the choice between a feeler gauge and paper can be just as significant. As you explore the nuances of these methods, consider how each tool can influence the quality of your prints and the ease of your printing experience. The path to mastering bed leveling lies in understanding which tool aligns best with your goals and workflow, ensuring consistently excellent results.
Importance of Bed Leveling Methods
When it comes to achieving ideal first layer adhesion and print quality, choosing the right bed leveling method is essential. Leveling with a feeler gauge offers a precise and consistent approach compared to the traditional paper method. Using a feeler gauge involves setting a specific distance between the nozzle and the bed, ensuring a reliable foundation for successful prints.
While the paper method is commonly used and free, it can lead to inconsistent results and requires more time for adjustments. Investing in a feeler gauge, though it may cost around $10, can provide quicker and more accurate bed leveling, ultimately improving your overall printing experience. Consider the benefits of each method to find the one that suits your needs best.
Evaluating First Layer Quality
To evaluate the quality of your first layer in 3D printing, observe its adhesion and uniformity on the build surface. Here's what to look for:
- Adhesion: Check if the first layer sticks uniformly across the build plate without gaps or uneven spots.
- Consistency: Verify that the extruded filament is evenly laid down without over-extrusion (bulging) or under-extrusion (gaps).
- Smoothness: The first layer should have a smooth and consistent texture, indicating proper nozzle height and bed leveling.
Pros and Cons Comparison
Comparing the paper method and the feeler gauge method for bed leveling reveals distinct advantages and disadvantages for each approach. The following table summarizes the pros and cons of each method:
| Method | Pros | Cons |
|---|---|---|
| Paper Method | – Free | – Inconsistent |
| – Easy once learned | – Time-consuming | |
| Feeler Gauge Method | – More consistent bed leveling | – Not free |
| – Faster than paper method | – Costs around $10 |
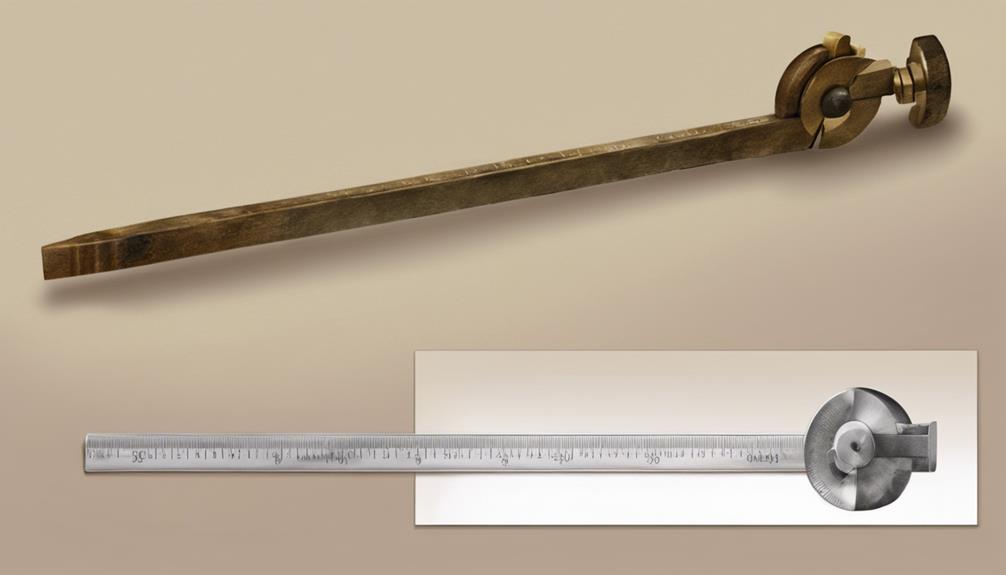
Feeler Gauge Vs Paper Accuracy
For a more accurate and consistent approach to bed leveling, the feeler gauge method excels over the paper method. When comparing the two methods for accuracy, consider the following:
- Feeler Gauge Accuracy:
- Offers precise measurements
- Guarantees consistent results
- Suitable for various bed surfaces
With a feeler gauge, you can achieve a level bed with confidence, knowing your prints will adhere correctly. Remember, precision is key to successful 3D prints.
User Experience and Recommendations
Consider your 3D printing journey enhanced by shifting from using paper to a feeler gauge for bed leveling, ensuring precise and consistent results. Users of the feeler gauge method often report higher satisfaction and peace of mind due to its precision.
Shifting to a feeler gauge can greatly improve your print quality by providing more accurate leveling. While paper is free and convenient for quick adjustments, the feeler gauge offers faster, more consistent results.
The feeler gauge, although requiring a small investment, typically around $10, provides long-term durability and reliability. For best bed leveling, the feeler gauge stands out for its ability to deliver precise measurements suitable for various bed surfaces, making it a recommended tool for your 3D printing arsenal.
Frequently Asked Questions
Can I Use Any Feeler Gauge for 3D Printer Bed Leveling?
Yes, you can use any feeler gauge for 3D printer bed leveling. Make sure the gauge suits your printer's requirements. Follow proper guidelines for best results. Consistent leveling is key for successful prints. Enjoy precise bed adjustments with the feeler gauge method.
Is the Paper Method Suitable for Textured Build Surfaces?
For textured build surfaces, using the paper method may not be ideal. It can lead to inconsistent results due to variations in texture. Consider utilizing a feeler gauge for precise leveling on textured surfaces to enhance print quality.
Are There Specific Feeler Gauge Thicknesses Recommended for Beginners?
For beginners, starting with feeler gauge thicknesses around 0.2mm to 0.3mm is recommended. These sizes provide a good starting point for precise bed leveling. Adjustments can be made based on your printer's specific requirements and first layer performance.
How Often Should I Replace the Paper Used for Leveling?
Replace leveling paper when it shows signs of wear like tears or thinning. Regularly check for inconsistencies in thickness. Fresh paper guarantees accurate leveling. Maintaining paper quality secures better first layers and successful prints.
Can I Combine Both Methods for More Precise Bed Leveling?
Yes, you can combine both methods for more precise bed leveling. Using a feeler gauge to set initial measurements and fine-tuning with paper can enhance accuracy. Experiment to find the best approach that suits your needs.
Conclusion
As you navigate the world of 3D printing, remember that the feeler gauge is your trusty compass, guiding you towards precision and perfection in bed leveling.
Just like a skilled chef relies on their measuring spoons for the perfect recipe, you can count on the feeler gauge to guarantee your prints come out flawlessly every time.
Embrace the feeler gauge as your secret weapon, and watch your creations rise to new heights.